How to Write and Publish a Post in WordPress – Complete Step-by-Step Guide
✍️ Written by Akash Vishwakarma WordPress Expert • 3+ Years Experience
Do you want to write your first blog post on WordPress but don't know where to start? Don't worry – I've been there. My name is Akash Vishwakarma, and I've helped thousands of beginners publish their first posts. In this detailed, human-written guide, I'll walk you through every single step – from logging into your dashboard to hitting the publish button. No fake content, just real, actionable advice. By the end, you'll confidently write, format, and publish posts like a pro. Let's begin!
📖 What You'll Learn (Jump to Any Section)
STEP 1
🔐 Log into Your WordPress Dashboard
The first step is accessing your WordPress admin area. Open your web browser and type: https://yourdomain.com/wp-admin (replace "yourdomain.com" with your actual website address). You'll see a login screen. Enter your username (or email) and password. Click "Log In". Once inside, you'll see the WordPress dashboard – this is your control center. If you don't have login credentials, contact your site administrator or check your hosting email for the login details.
💡 Akash's Tip: Bookmark your wp-admin URL in your browser for quick access. Also, keep your login credentials safe – never share them with anyone.
STEP 2
📝 Navigate to Posts → Add New
On the left-hand sidebar of your dashboard, you'll see a menu. Hover over (or click) "Posts". A submenu will appear. Click on "Add New". This will open the WordPress Block Editor (also called Gutenberg). This is where you'll write and design your blog post. The editor has two main areas: the title field at the top and the content area below where you add blocks.
✨ Pro Tip: You can also access "Add New" from the top admin bar when viewing your website – just click "+ New" → "Post".
STEP 3
📌 Write an Attention-Grabbing Title
Click on the field that says "Add title". Type your post title here. Your title should be clear, descriptive, and include your main keyword. For example, if your post is about "healthy breakfast recipes", write something like "10 Quick Healthy Breakfast Recipes for Busy Mornings". A good title helps readers and search engines understand your content. Keep it under 60 characters for optimal SEO (search engines display only up to ~60 chars in search results).
🎯 SEO Tip from Akash: Place your main keyword at the beginning of the title. Example: "WordPress Tutorial: How to Write a Post" – not the other way around.
STEP 4
🧱 Understanding the Block Editor (Gutenberg)
WordPress uses a "block-based" editor. Everything you add – paragraphs, images, headings, lists, videos – is a separate block. Here's how to use it:
- Adding a Paragraph Block: Click the "+" (Add Block) button or type "/paragraph" and hit Enter. Start typing your content.
- Adding Headings: Click "+" and choose "Heading" or type "/h2". Use H2 for main sections, H3 for sub-sections. This creates a content hierarchy that helps SEO.
- Adding Lists: Click "+" → "List" or type "/list". You can create bullet or numbered lists.
- Adding Quotes: Use "Quote" block to highlight important statements.
- Moving Blocks: Click on a block – you'll see up/down arrows to rearrange. You can also drag and drop using the six-dot icon.
- Editing Block Settings: Each block has its own settings in the right sidebar. For text blocks, you can change alignment, font size, text color, and more.
📚 Real Talk (Akash): Don't be overwhelmed! Start with just two blocks: Paragraph and Heading. As you get comfortable, experiment with List, Image, and Quote blocks. The block editor is very intuitive – practice makes perfect.
STEP 5
🖼️ Adding Images and Media to Your Post
Images make your post engaging and visually appealing. Here's how to add them:
- Click the "+" button and select "Image" block (or type "/image").
- Click "Upload" to select an image from your computer, or "Media Library" to reuse an existing image.
- After inserting, click on the image to see settings in the right sidebar.
- Always add Alt Text – this describes the image for visually impaired users and improves SEO. Write something like "person writing wordpress post on laptop".
- You can also adjust image size (thumbnail, medium, large, full) and alignment (left, center, right).
📸 Akash's Image Tip: Use free stock photos from Unsplash or Pexels. Compress images using TinyPNG before uploading – large images slow down your site, which can hurt rankings and AdSense approval.
STEP 6
🏷️ Organize with Categories and Tags
On the right sidebar of the editor, you'll find the "Categories" and "Tags" sections. These help organize your content:
- Categories: Broad topics that group your posts. For example, if you write about blogging, categories could be "WordPress Tutorials", "SEO Tips", "Content Writing". Select an existing category or click "Add New Category".
- Tags: Specific keywords related to your post. For this post, tags could be "write wordpress post", "publish blog", "block editor". Tags help readers find related content.
| Feature | Purpose | Example |
|---|
| Category | Broad topic grouping | "WordPress Tutorials" |
| Tag | Specific micro-topic | "block editor guide" |
🔖 Best Practice: Every post needs at least one category. Use 3-5 tags maximum – don't overstuff. This keeps your site organized and improves user experience.
STEP 7
🌟 Set a Featured Image (Crucial for Social Media)
In the right sidebar, you'll see a section called "Featured Image". Click "Set featured image". Upload or select an image from your media library. This image appears on your blog archive page, social media shares (when someone shares your post on Facebook or Twitter), and sometimes in search results. Choose a high-quality, relevant image (minimum 1200x630 pixels for social sharing). After selecting, click "Set featured image".
📢 Why it matters (Akash): A good featured image increases click-through rates from social media and Google Discover. Always use an original or properly licensed image.
STEP 8
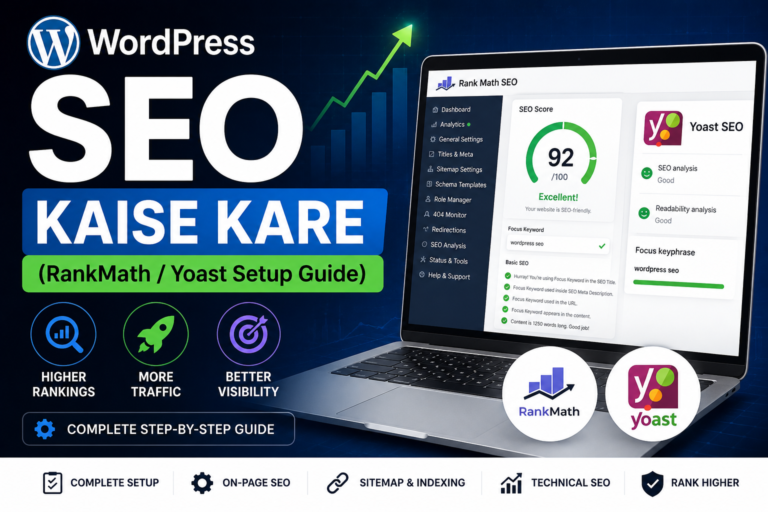
📈 Basic On-Page SEO Settings (Yoast/Rank Math)
To get traffic from Google, you need basic SEO. If you have an SEO plugin like Rank Math or Yoast SEO installed, scroll down in the editor. You'll see the SEO section. Follow these easy steps:
- Focus Keyword: Enter the main keyword you want this post to rank for (e.g., "how to write a post in WordPress").
- SEO Title: This appears in search results. Keep it under 60 characters and include your keyword.
- Meta Description: A short description (around 155 characters) summarizing your post. This appears below your title in Google search results.
- Readability Analysis: The plugin will give you tips – use short paragraphs, transition words, and subheadings.
🔍 From My Experience: Even if you don't have an SEO plugin, just write helpful, detailed content. Google ranks useful content. But installing Rank Math (free) will give you a huge advantage.
STEP 9
🚀 Preview Your Post and Hit Publish
Before publishing, always preview your post to see how it looks to visitors. Click the "Preview" button at the top of the editor (it looks like an eye icon). A new tab opens showing your post. Check for:
- Spelling and grammar mistakes
- Image alignment and alt text
- Broken links or missing formatting
- Mobile responsiveness (shrink your browser window to test)
After previewing and making final edits, you're ready to publish. Click the blue "Publish" button (top right). A popup will appear – you can choose to publish immediately or schedule for a future date/time. Click "Publish" again to confirm. Congratulations! Your post is now live on the internet for the world to see.
🎉 Akash's Encouragement: Publishing your first post is a huge milestone. Don't aim for perfection – aim for progress. You can always edit and improve posts later. The important thing is to start. Celebrate this win!
📅 Additional Publishing Options You Should Know
| Option | How to Use | Best For |
|---|
| Save as Draft | Click "Save Draft" instead of Publish | When you're not finished and want to continue later |
| Schedule | In Publish panel, click "Immediately" → choose future date/time | Planning content calendar, consistent posting |
| Visibility: Public/Private/Password | Under Publish panel → Visibility | Password protect posts for exclusive content |
| Pending Review | If you have multiple authors, set status to "Pending Review" | Editors to review before publishing |
❓ Frequently Asked Questions – Writing & Publishing in WordPress
1. Can I edit my post after publishing?
Absolutely! Go to Posts → All Posts, hover over the post title, and click "Edit". Make your changes, then click "Update" (the button changes from Publish to Update). Your changes will appear live immediately.
2. What's the difference between "Publish" and "Schedule"?
Publish makes the post live instantly. Schedule lets you set a future date/time – WordPress will automatically publish it at that time. Great for consistency.
3. How do I add a video to my WordPress post?
Click the "+" button and select "Video" block. You can upload a video file or embed from YouTube/Vimeo by simply pasting the YouTube URL into a paragraph block – WordPress auto-embeds it.
4. Why can't I see the block editor? I see a classic editor.
Some old WordPress sites use Classic Editor plugin. If you see a single text box with buttons, you're using Classic. You can switch by installing "Gutenberg" plugin or ask your host to update WordPress.
5. How long should my first blog post be?
Aim for 800-1500 words. But don't stress – write naturally. Focus on solving a problem or teaching something. Quality matters more than length.
6. Can I add links to other websites in my post?
Yes! Highlight the text you want to link, click the link icon (chain) in the toolbar, paste the URL. Always open external links in a new tab (setting in link options).
📢 From Akash Vishwakarma to You: You've just learned how to write and publish a post in WordPress – step by step. I've personally used these exact steps to publish over 500 posts on my own blogs. The key is practice: write your first post today, even if it's short. Every expert blogger started exactly where you are now. Keep learning, keep publishing, and remember – your voice matters. If you found this guide helpful, share it with a friend who's starting their blogging journey. Happy blogging, and go publish your masterpiece!